
method of making a
Quilt As You Go
quilt,
So, here's my tutorial.
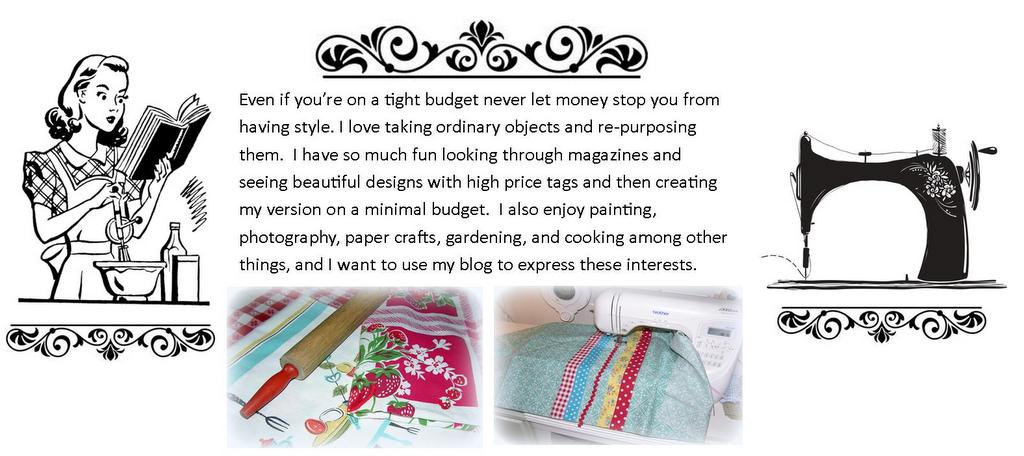
First you start out with blocks that you
have pieced (or plain fabric blocks)
Sandwich them with batting and a back,
and then quilt them on your machine.
Before getting ready to join them.
trim them all to same size.

Next you want to cut strips
one inch wide and
some two inch wide.

Next you fold and iron the two inch strips so
that they make a doubled inch wide strip.

After making your blocks . . .
which are two fabrics sandwiched together
and quilted, you use these strips
to join them.
I put the folded strip on the backside of my quilt
and the one inch strip on the top.

Pin them in place.

Then sew them to your quilt block.

After they are sewn on they will look like this.

Next you spread the one inch strip flat
and pin it to the block that you are joining to.


This is the important stage where if you have more than
one block in the sections that you are joining
be sure to match your seams and pin.
Otherwise they will stretch and not match up.

Next stitch only the one inch strip to the next block.
ALL STITCHES ARE 1/4 INCH WIDE.

After doing that, your front will lay flat
and look like this.
* Note: I made my blocks 30 inches square
using nine 10 inch squares of fabric.
I did this before joining them.
You can join your blocks at any size that you prefer,
but anything larger than a 30 inch square makes it harder
to quilt
on a regular sewing machine.

The back of your quilt will look like this.

I fold this over the raw batting edges
and hand hem them.

This makes a very nice back.
If you want to do everything on the machine,
then you might want to reverse
and sew the two inch folded strip to the top.
Then sew it down with your machine.

Here you see the front of the two sections
that I joined together.
After hemming the backs,
you are ready to join these two sections
the same way.


This is a joined 60 inch section.
I have plans to add(in the same way)
boarders to the top and bottom.
I'm making this to spread over a twin bed.
I'm also adding some applique to this
before I finish it and add my binding.
There will be pictures when I'm finished.
I'm doing a balancing act of
gardening, canning, and quilting, LOL.
I would also like to add kayaking
to that list . . . we'll see :)
~~~~~~*****~~~~~~
This is how I learned this method
and she does a better job of explaining
the method with her great video.
https://www.youtube.com/watch?v=ji8BLS2rNHA
You will notice that she puts the folded
strip on top, and the one inch on the bottom.
Just opposite of my way.
That is because she does hers all on the machine.
I just think that hand hemming the back
is prettier,
but I have done both.
I just think that hand hemming the back
is prettier,
but I have done both.
~~~~~~*****~~~~~~
Thank you for visiting. . .
~~~~~*****~~~~~
Keep Smiling!
~~~~~*****~~~~~
Your blogging sister,
Connie :)
I have never seen this method of quilting before. It looks like a fun and different way to quilt. You always do a beautiful job, Connie, no matter how you quilt.
ReplyDeleteIt sounds like you are a busy girl...can you kayak and quilt at the same time? Just wondering. lol xo Diana
I wish :)
DeleteInteresting. I've wondered how that was done. I still haven't attempted quilting. Maybe some day
ReplyDeleteBe careful because once you start, it's hard to ever go back to a normal life again, LOL.
DeleteConnie, That is beautiful. Love all the colors you have picked. I am just not a quilter. My aunt was a wonderful one, she did it all by hand. I think she would have loved a machine.. Do you quilt with others ? Blessings, xoxo, Susie
ReplyDeleteI have not quilted with others, but know of a group that I have been thinking about visiting. I know that I have so much to learn and this would be a great way. My sweet neighbor/friend share ideas and we have both learned tricks and techniques from each other.
DeleteIt is going to be pretty. I have did one quilt as you go quilt...you can see it here if you are interested. It is pretty big. I sure don't get much done these days...but it is sure fun seeing what others are doing.
ReplyDeleteOh my goodness Rose . . . I visited your post and that quilt is gorgeous. I encourage any of my blogging sisters that read this to click your link and look at your quilt. I love it!!! Thanks for sharing :)
DeleteRose, your quilt is beautiful! I love the string quilt method.. in t he 70's I made some string pillows and a string quilt vest.. .always wanted to make a big quilt with this Quilt as you Go Method.. someday... someday! Yours is gorgeous. Marilyn
DeleteHi Connie, Thank you for those instructions. I have not tried that yet. Can you say chicken! Or maybe it is time and energy. I do want to eventually get to it. I have been super busy and guess I tried to do too much and have crashed energy wise so now I will need to rest and try to get it back up. This Chronic Lyme is the pits but others have things much worse than I do. Prayers needed. Thanks. Good luck on your balancing act of garden, quilts and all you do. I hope you get to kayak too. The weather here the past couple of days has been just beautiful. Nancy
ReplyDeleteI have been in crash mode this afternoon, too. I got up at 3:30 am and started my day. We ate early and by 5:30 I was sleeping in my chair and slept for two hours, LOL. Our weather is terrible right now. August is always the worst with hot temperatures, but our air quality is so bad from the fires north of us. Like you said, so many people have it worst. It is my pleasure to add you to my prayers, God bless you and your hubby. Have they ever found a cure for Chronic Lyme?
DeleteOh how cute these quilts are! You make it look soooo easy! Connie, you have such beautiful talent....keep it up. I have always wanted to learn to quilt but never took the time....maybe soon. My Grandmother was a hand quilter...I wish I had learned from her. I have 3 quilts she handmade. They mean much to me. Keep up the beautiful work! You are an inspiration to others. Blessings, Roxie
ReplyDeleteRoxie those quilts of your grandmother's are true treasures. I enjoy hand-quilting and will probably have a winter project, hand quilted quilts are so much softer and there is a very special love that goes into each and every stitch that is placed there by hand. I do enjoy this new method because it give me a change to create a strongly made quilt that comes together much faster and that will hold up to lots of wear and tear. This one is for my ten year old granddaughter's birthday and I expect that it will go through pajama parties, dogs jumping in the bed, and even hauled out to the living room to cozy up on movie night with a big bowl of buttered popcorn. I expect it to be used and loved and it is a way for me to be hugging her from 500 miles away. :)
DeleteHow wonderful that you can make a quilt this way. It seems complicated when I read about making it but probably to someone who knows all about quilting it would all seem perfectly clear.
ReplyDeleteI have found that anything that looks complicated, when it is broke down into step by step sections, it truly isn't hard at all. You just have to look at each step and go through it without worrying about the next. This is truly the easiest method that I know for quilting. If you like to sew you should try it. Maybe a baby quilt :)
DeleteI still don't understand exactly, but will be pinning it and coming back when I have time to really study it.
ReplyDeleteWatching the video will be a big help to understanding this process. I hope you give it a try one day. Happy Quilting :)
DeleteThank you! This makes me want to try making a quilt. If I start one (this winter) I will have to come back and read each step as I go. I don't know how you do so much!! :)
ReplyDeleteI suggest that you watch the video and then bookmark it (that's what I did) it helped me the first couple of times that I used this quilting method. It's a great way to build a quilt and when all the blocks are assembled it is finished except for the binding :)
Deletethank you for showing that method. I haven't used it yet but after my current WIP quilt I want to try it. Thank you also for the link to the video....one can never have too much information when it comes to learning a new technique! Your quilt is so pretty. I love the fabrics. You do have a lot going on! I hope you get to the kayaking too!
ReplyDeleteIt's been a busy summer and that is without even getting off our little acre. The garden is huge and now that harvesting, canning and freezing is happening, it's busier than ever. Today I am planning on making blackberry jam, Yum! Please let me know how you like this technique; I think that you will :)
DeleteYou made that sound easy. My sewing skills are limited but I'm wondering if I could do this with that bag of my fathers clothes. Maybe with a good plan and some self will. Just maybe I could.
ReplyDeletexx Beca
I know that you can . . . I have reached an age where I've smartened up enough to not waste my life stressing over difficult tasks . . . if you see a project on my blog . . . believe me, it is manageable without stressing over. I've also adopted the opinion that being imperfectly perfect is just fine. After all we are not perfect, so why do we waste our time striving to be perfect. That doesn't mean that we shouldn't do our best, but we need to accept our best as wonderful, very wonderful :) I think a quilt made from your Dad's clothes would be amazing . . . you'll still be able to feel his hug when you wrap up in it :) How great is that?
DeleteWell done on showing this post, I just know so many will find it useful.
ReplyDeleteYour balancing act of gardening, canning, and quilting must keep you busy!
All the best Jan
Busy as a little bee, but I love it :)
DeleteThank you for the instructions, Connie. I love the fabrics you use. Happy quilting, my friend.
ReplyDeleteHi Mai, thank you for visiting :) I purchased the fabric online at Green Fairy Quilts, they are a great company to do business with :)
DeleteI SO want/need to make one of these! I love the string or strip quilting method.... ever since the time the book was published years ago by Rita Davis titled Simple Yet Stunning Quilts (quilt as you go), I've wanted to quilt with this method! She uses big blocks too and big wide strips. I don't know how you do it all... gardening, making things, painting signs, baking, canning and kayaking! We're experiencing a thunder storm here right now (Thursday evening) and it's even raining a little bit.. the first time in probably 2 months! Still 90 out but is so nice to feel and smell the rain! Take care... and keep inspiring me! Marilyn xoxox
ReplyDeleteWe woke to a wet world on Sunday morning . . . rain, isn't it wonder:)
DeleteI have never tried this technique before in my quilting, you have done a lovely job on these, such pretty fabrics also!
ReplyDeleteHi Connie, I hope you give this a try. If you do please let me know how you like it.
DeleteI've wanted to try QAYG for a long, long time. It would be the perfect way to make a queen size quilt for our bed without having to hand quilt it or have someone machine quilt it on a long arm, which is so expensive. Thanks for sharing. Hugs.
ReplyDeleteNancy, you will love this method. When I make a quilt I want to be able to do the whole quilt myself, that plus I don't want to have to pay someone else to quilt it. This method makes it very easy to make a large quilt on a regular sewing machine. Happy quilting!
DeleteConnie:)